Today, in this article, I will explain how to perform CRUD operation using Angular 4, MVC, Web API and SQL Server in Visual Studio. Simultaneously, we will see the Routing concept in Angular 4. Here, to perform the CRUD operation first we will create Web API service using Entity Framework and SQL. After that, we will create an MVC project for consuming the Web API service using Angular 4. So now, let us see step by step.


Now, we can see the output. It is not giving the expected result but some error.
Step 1
First, we will create a table in SQL Database. So, we will open the SQL Database and then we have to create a table. Here I am creating an Employee table.
Step 2
Now, First, we will create Web API service for this we will open the Visual Studio and go to the File >> New >> Project >> Web Application
After that, it will open a window then we will select Web API and press the OK button.
Step 3
Now we will add an API Controller. So Go the controller folder and right-click >> Add>>Controller >> Web Api2 Controller – Empty >> Add
Step 4
Here, we will add the table using Database First Approach in Entity Framework. So for that we will go to the Model folder and Right click >> Add >> New Item >>Data >>ADO.NET Entity Data Model >> Add
Select EF Designer from the database and then we will click on Next Button.

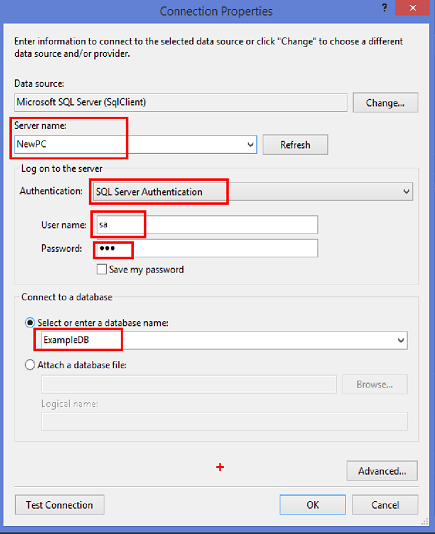
After open the window we will give Server Name >> SQL Authentication >> ID & Password >> Select Database>> Test Connection >> Ok >> Ok like in below image.
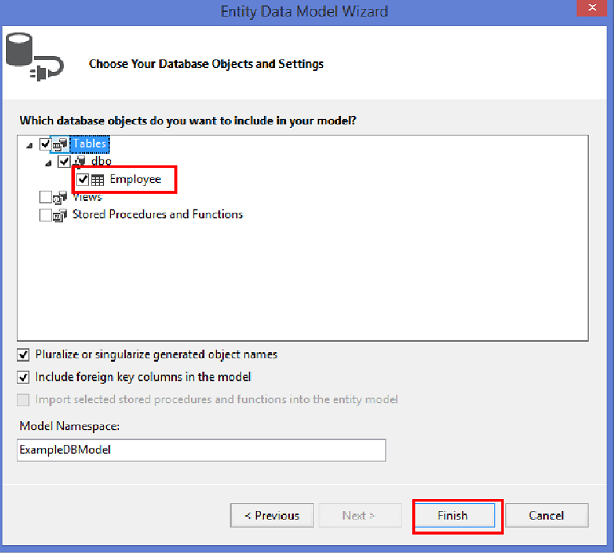
Click on the Next button. After that, we will check the Employee table and Click Finish Button like the below image.
Step 5
Now we will write the logic for Retrieve, Insert, Update and Delete operation to perform CRUD operation of Employee in Web API Controller. For this, Go in Controller folder and open EmployeeAPI Controller and Write below logic
[RoutePrefix("api/Employee")]
public class EmployeeAPIController : ApiController
{
ExampleDBEntities objEntity = new ExampleDBEntities();
//This method for retrive Employee
[HttpGet]
[Route("BindEmpDetails")]
public List<Employee> BindEmp()
{
List<Employee> empDetail = new List<Employee>();
empDetail = objEntity.Employees.ToList();
return empDetail;
}
//This method for Insert Employee
[HttpPost]
[Route("InsertEmp")]
public string InserEmp(Employee objEmployee)
{
objEntity.Employees.Add(objEmployee);
int i = objEntity.SaveChanges();
if (i > 0)
{
return "Insertion successfull";
}
else
{
return "Insertion Faild";
}
}
//This method for Update Employee
[HttpPut]
[Route("UpdateEmp")]
public string UpdateEmp(Employee data)
{
string objPost = string.Empty;
string message = "";
Employee objEmp = new Employee();
objEmp = objEntity.Employees.Find(data.EmployeeId);
if (objEmp != null)
{
objEmp.EmpName = data.EmpName;
objEmp.Address = data.Address;
objEmp.EmailId = data.EmailId;
objEmp.MobileNo = data.MobileNo;
objEmp.DeptName = data.DeptName;
objEmp.DateOfBirth = data.DateOfBirth;
objEmp.PineCode = data.PineCode;
}
int i = this.objEntity.SaveChanges();
if (i > 0)
{
message = "Updation success";
}
else
{
message = "Updation faild";
}
return message;
}
//This method for Delete Employee
[HttpDelete]
[Route("EmpDelete/{id}")]
public string EmployeeDelete(int id)
{
string strMsg = string.Empty;
var objEmp = objEntity.Employees.Find(id);
objEntity.Employees.Remove(objEmp);
int i = objEntity.SaveChanges();
if (i > 0)
{
strMsg = "Deletion Successful";
}
else
{
strMsg = "Deletion Faild";
}
return strMsg;
}
}
Now we completed API Part. We can see the folder architecture of the Web Api Project below.
Step 6
After completed the API part. Now we will create a for consuming the web Api Service in MVC using Angular.
So, first we will add a MVC Project. Right click of Solution of AngularCRUDMVC >> Add >> New Project >> Asp.Net Web Application >> OK >> MVC >> Ok
Step 7
Now, we will configuration Angular 4 in Visual studio. Before the start of the angular 4 functionality, we have to install Node.js and npm if they are not already on your machine.
Now we will check Install Typescripts 2.2 for Visual Studio 2015 link if you have not installed typescript then follow this link.
Now I have to add 3 files i.e 1. tsconfig.json 2.systemjs.config.js 3.package.json in the root folder in MVC project like below Image
Now, Right-click of the root folder of MVC Project and select Add >> New Item >> select json file

And give the file name tsconfig.json and write below code
tsconfig.json
{
"compilerOptions": {
"target": "es5",
"module": "commonjs",
"moduleResolution": "node",
"sourceMap": true,
"emitDecoratorMetadata": true,
"experimentalDecorators": true,
"lib": [ "es2015", "dom" ],
"noImplicitAny": true,
"suppressImplicitAnyIndexErrors": true,
"noStrictGenericChecks": true
}
}
Next, we have two more files systemjs.config.js and package.json
Now, Right-click of the root folder of MVC Project and select Add >> New Item >> select javascript file and write the below code.
systemjs.config.js
/**
* System configuration for Angular samples
* Adjust as necessary for your application needs.
*/
(function (global) {
System.config({
paths: {
// paths serve as alias
'npm:': '../node_modules/'
},
// map tells the System loader where to look for things
map: {
// our app is within the app folder
'app': '../app',
// angular bundles
'@angular/core': 'npm:@angular/core/bundles/core.umd.js',
'@angular/common': 'npm:@angular/common/bundles/common.umd.js',
'@angular/compiler': 'npm:@angular/compiler/bundles/compiler.umd.js',
'@angular/platform-browser': 'npm:@angular/platform-browser/bundles/platform-browser.umd.js',
'@angular/platform-browser-dynamic': 'npm:@angular/platform-browser-dynamic/bundles/platform-browser-dynamic.umd.js',
'@angular/http': 'npm:@angular/http/bundles/http.umd.js',
'@angular/router': 'npm:@angular/router/bundles/router.umd.js',
'@angular/forms': 'npm:@angular/forms/bundles/forms.umd.js',
'@angular/animations': 'npm:@angular/animations/bundles/animations.umd.js',
'@angular/animations/browser': 'npm:@angular/animations/bundles/animations-browser.umd.js',
'@angular/platform-browser/animations': 'npm:@angular/platform-browser/bundles/platform-browser-animations.umd.js',
'@angular/material': 'npm:@angular/material/bundles/material.umd.js',
// other libraries
'rxjs': 'npm:rxjs',
'angular-in-memory-web-api': 'npm:angular-in-memory-web-api/bundles/in-memory-web-api.umd.js',
'ng2-bs3-modal': 'npm:/ng2-bs3-modal',
'Service': '/Service'
},
// packages tells the System loader how to load when no filename and/or no extension
packages: {
app: {
main: 'main.js', defaultExtension: 'js'
},
rxjs: {
defaultExtension: 'js'
},
'ng2-bs3-modal':
{ main: '/bundles/ng2-bs3-modal.js', defaultExtension: 'js' }
}
});
})(this);
Now, Right-click of the root folder of MVC Project and select Add >> New Item >> select json file and write the below code.
package.json
{
"name": "angular-quickstart",
"version": "1.0.0",
"description": "QuickStart package.json from the documentation for visual studio 2017 & WebApi",
"scripts": {
"start": "tsc && concurrently \"tsc -w\" \"lite-server\" ",
"lint": "tslint ./app/**/*.ts -t verbose",
"lite": "lite-server",
"pree2e": "webdriver-manager update",
"test": "tsc && concurrently \"tsc -w\" \"karma start karma.conf.js\"",
"test-once": "tsc && karma start karma.conf.js --single-run",
"tsc": "tsc",
"tsc:w": "tsc -w"
},
"keywords": [],
"author": "",
"license": "MIT",
"dependencies": {
"@angular/common": "4.0.2",
"@angular/compiler": "4.0.2",
"@angular/core": "4.0.2",
"@angular/forms": "4.0.2",
"@angular/http": "4.0.2",
"@angular/platform-browser": "4.0.2",
"@angular/platform-browser-dynamic": "4.0.2",
"@angular/router": "4.0.2",
"angular-in-memory-web-api": "0.2.4",
"systemjs": "0.19.40",
"core-js": "2.4.1",
"rxjs": "5.0.1",
"zone.js": "0.7.4"
},
"devDependencies": {
"concurrently": "3.2.0",
"lite-server": "2.2.2",
"typescript": "2.0.10",
"canonical-path": "0.0.2",
"tslint": "3.15.1",
"lodash": "4.16.4",
"jasmine-core": "2.4.1",
"karma": "1.3.0",
"karma-chrome-launcher": "2.0.0",
"karma-cli": "1.0.1",
"karma-jasmine": "1.0.2",
"karma-jasmine-html-reporter": "0.2.2",
"protractor": "4.0.14",
"rimraf": "2.5.4",
"@types/node": "6.0.46",
"@types/jasmine": "2.5.36",
"@angular/material": "2.0.0-beta.6",
"@angular/animations": "4.1.3"
},
"repository": {}
}
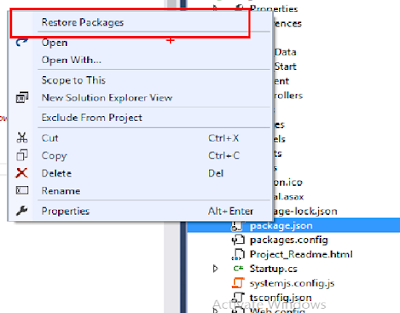
After that right click of package.json file and select Restore Package
After that wait few minutes, it will install node_modules file
Step 8
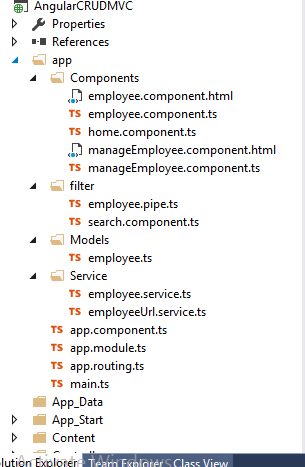
Now we add the app folder in the root folder in of MVC Project and also we will add some more folder and files according to the below image.
Now go to the app folder and right-click >> add >> New Folder >> select folder and change name Model of the new folder and after that add employee.ts file. Right-click >> add >> TypeScript File >> select file and change name employee.ts of the file and write the below code.
export interface IEmployee {
EmployeeId: number,
EmpName: string,
Address: string,
EmailId: string,
MobileNo: string,
DeptName: string,
DateOfBirth: string,
PineCode: string
}
Now go to the app folder and right-click >> add >> New Folder >> select folder and change name Service of the new folder and after that add employeeUrl.service.ts file.
Right-click >> add >> TypeScript File >> select file and change nameemployeeUrl.service.ts of the file and add all CRUD related web API URL.
export class MyApiUrl {
public static RetriveEmpDetails = 'http://localhost:62877/api/Employee/BindEmpDetails';
public static InsertEmpDetails = 'http://localhost:62877/api/Employee/InsertEmp';
public static UpdateEmpDetails = 'http://localhost:62877/api/Employee/UpdateEmp';
public static DeleteEmpDetails = 'http://localhost:62877/api/Employee/EmpDelete';
}
Again, we will add employee.service.ts. Right-click >> add >> TypeScript File >> select file and change name employee.service.ts of the file and write the below code.
import { Injectable } from '@angular/core';
import { Http, Response, Headers, RequestOptions } from '@angular/http';
import { Observable } from 'rxjs/Observable';
import 'rxjs/add/operator/map';
import 'rxjs/add/operator/do';
import 'rxjs/add/operator/catch';
@Injectable()
export class EmployeeService {
constructor(private _http: Http) { }
get(url: string): Observable<any> {
return this._http.get(url)
.map((response: Response) => <any>response.json())
.catch(this.handleError);
}
post(url: string, model: any): Observable<any> {
let body = JSON.stringify(model);
let headers = new Headers({ 'Content-Type': 'application/json' });
let options = new RequestOptions({ headers: headers });
return this._http.post(url, body, options)
.map((response: Response) => <any>response.json())
.catch(this.handleError);
}
put(url: string, id: number, model: any): Observable<any> {
let data = JSON.stringify(model);
let headers = new Headers({ 'Content-Type': 'application/json' });
let options = new RequestOptions({ headers: headers });
return this._http.put(url, data, options)
.map((response: Response) => <any>response.json())
.catch(this.handleError);
}
delete(url: string, id: number): Observable<any> {
let headers = new Headers({ 'Content-Type': 'application/json' });
let options = new RequestOptions({ headers: headers });
return this._http.delete(url + '/' + id, options)
.map((response: Response) => <any>response.json())
.catch(this.handleError);
}
private handleError(error: Response) {
console.error(error);
return Observable.throw(error.json().error || 'Server error');
}
}
Now go to the app folder and right-click >> add >> TypeScript File >> select file and change name main.ts of the file and write the below code.
import { platformBrowserDynamic } from '@angular/platform-browser-dynamic';
import { AppModule } from './app.module';
platformBrowserDynamic().bootstrapModule(AppModule);
After that, we will add components folder in the app folder so right click of the app folder adds a folder and change the folder name to components.
Now, we will add home.component.ts in the Components folder, go to the Components folder and right-click >> add >> TypeScript File >> select file and change name home.component.ts of the file and write below code.
import { Component } from "@angular/core";
@Component({
template: `
<md-card class="example-card">
<md-card-header>
<div md-card-avatar class="example-header-image"></div>
<md-card-title>Users</md-card-title>
<md-card-subtitle>Sample Image</md-card-subtitle>
</md-card-header>
<img md-card-image width="200" height="150" src="../../images/home-page.jpg">
<md-card-content>
<p>
In this application, you can add new user, edit and delete existing user.
</p>
</md-card-content>
<md-card-actions>
<button md-button>LIKE</button>
<button md-button>SHARE</button>
</md-card-actions>
</md-card>
`
})
export class HomeComponent {
}
Now, we will add employee.component.ts in the Components folder, go to the Components folder and right-click >> add >> TypeScript File >> select file and change employee.component.ts of the file and write below code.
import { Component, OnInit, ViewChild } from '@angular/core';
import { EmployeeService } from '../Service/employee.service';
import { IEmployee } from '../Models/employee';
import { Observable } from 'rxjs/Rx';
import { MyApiUrl } from '../Service/employeeUrl.service';
import { manageEmployee } from './manageEmployee.component';
import { MdDialog, MdDialogRef } from '@angular/material';
@Component({
templateUrl: '../app/Components/employee.component.html'
})
export class EmployeeComponent implements OnInit {
employees: IEmployee[];
employee: IEmployee;
msg: string;
action: string;
modalTitle: string;
modalBtnTitle: string;
listFilter: string;
searchTitle: string = "Search: ";
selectedOption: string;
constructor(private _empService: EmployeeService, private dialog: MdDialog) { }
openDialog() {
let dialogRef = this.dialog.open(manageEmployee);
dialogRef.componentInstance.action = this.action;
dialogRef.componentInstance.modalTitle = this.modalTitle;
dialogRef.componentInstance.modalBtnTitle = this.modalBtnTitle;
dialogRef.componentInstance.employee = this.employee;
dialogRef.afterClosed().subscribe(result => {
this.LoadEmployees();
switch (this.action) {
case "create":
this.msg = result;
break;
case "update":
this.msg = result;
break;
case "delete":
this.msg = result;
break;
}
});
}
ngOnInit(): void {
this.LoadEmployees();
}
LoadEmployees(): void {
this._empService.get(MyApiUrl.RetriveEmpDetails)
.subscribe(emps => { this.employees = emps; }
);
}
addEmployee() {
this.action = "create";
this.modalTitle = "Add New Employee";
this.modalBtnTitle = "Add";
this.openDialog();
}
editEmployee(id: number) {
this.action = "update";
this.modalTitle = "Edit Employee";
this.modalBtnTitle = "Update";
this.employee = this.employees.filter(x => x.EmployeeId == id)[0];
this.openDialog();
}
deleteEmployee(id: number) {
this.action = "delete";
this.modalTitle = "Confirm to Delete?";
this.modalBtnTitle = "Delete";
this.employee = this.employees.filter(x => x.EmployeeId == id)[0];
this.openDialog();
}
criteriaChange(value: string): void {
if (value != '[object Event]')
this.listFilter = value;
}
}
Now, we will add employee.component.html in the Components folder, go to the components folder and right-click >> add >> TypeScript File >> select file and change employee.component.html of the file and write below code.
<div class='panel panel-primary'>
<div class='panel-heading'>
Employee Details
</div>
<div class='panel-body'>
<div>
<search-list [title]='searchTitle' (change)="criteriaChange($event)"></search-list>
</div>
<div class='table-responsive'>
<div style="padding-bottom:10px"><button class="btn btn-primary" (click)="addEmployee()">Add Employee </button></div>
<div *ngIf='employees && employees.length==0' class="alert alert-info" role="alert">No record found!</div>
<table class='table table-striped' *ngIf='employees; else loadingScreen;'>
<thead>
<tr>
<th>Employee Name</th>
<th>Address</th>
<th>Email Id</th>
<th>Mobile Number</th>
<th>Dept Name</th>
<th>DateOfBirth</th>
<th>Action</th>
</tr>
</thead>
<tbody>
<tr *ngFor="let emp of employees | employeeFilter:listFilter">
<td>{{emp.EmpName}}</td>
<td>{{emp.Address}}</td>
<td>{{emp.EmailId}}</td>
<td>{{emp.MobileNo}}</td>
<td>{{emp.DeptName}}</td>
<td>{{emp.DateOfBirth}}</td>
<td>
<button title="Edit" class="btn btn-primary" (click)="editEmployee(emp.EmployeeId)">Edit</button>
<button title="Delete" class="btn btn-danger" (click)="deleteEmployee(emp.EmployeeId)">Delete</button>
</td>
</tr>
</tbody>
</table>
<ng-template #loadingScreen><div class="alert alert-info" role="alert"><md-progress-spinner mode="indeterminate" style="width:50px; height:50px"></md-progress-spinner>loading...</div></ng-template>
</div>
<div *ngIf="msg" role="alert" class="alert alert-info alert-dismissible">
<button type="button" class="close" data-dismiss="alert" aria-label="Close"><span aria-hidden="true">×</span></button>
<span class="glyphicon glyphicon-exclamation-sign" aria-hidden="true"></span>
<span class="sr-only">Error:</span>
{{msg}}
</div>
</div>
</div>
Now, we will add manageEmployee.component.ts in the Components folder, go to the Components folder and right-click >> add >> TypeScript File >> select file and change manageEmployee.component.ts of the file and write below code.
import { Component, OnInit, ViewChild } from '@angular/core';
import { EmployeeService } from '../Service/employee.service';
import { MyApiUrl } from '../Service/employeeUrl.service';
import { FormBuilder, FormGroup, Validators } from '@angular/forms';
import { IEmployee } from '../Models/employee';
import { Observable } from 'rxjs/Rx';
import { MdDialog, MdDialogRef } from '@angular/material';
import { FormControl } from '@angular/forms';
@Component({
templateUrl: '../app/Components/manageEmployee.component.html',
})
export class manageEmployee implements OnInit {
msg: string;
indLoading: boolean = false;
empFrm: FormGroup;
action: string;
modalTitle: string;
modalBtnTitle: string;
listFilter: string;
selectedOption: string;
employee: IEmployee;
stateCtrl: FormControl;
filteredDepts: any;
Depts = [
'IT',
'Clerk',
'HR',
'Manager',
'Security',
'Developer',
'Tester',
'B. A.',
];
constructor(private fb: FormBuilder, private _employeeService: EmployeeService, public dialogRef: MdDialogRef<manageEmployee>) { }
filterDepts(val: string) {
return val ? this.Depts.filter(s => new RegExp(`^${val}`, 'gi').test(s))
: this.Depts;
}
ngOnInit(): void {
this.empFrm = this.fb.group({
EmployeeId: [''],
EmpName: ['', [Validators.required, Validators.maxLength(50)]],
Address: ['', [Validators.required, Validators.maxLength(500)]],
EmailId: ['', [Validators.required, Validators.email]],
MobileNo: ['', Validators.required],
DeptName: ['', Validators.required],
DateOfBirth: ['', Validators.required],
PineCode: ['', Validators.required]
});
this.filteredDepts = this.empFrm.controls["DeptName"].valueChanges.startWith(null).map(name => this.filterDepts(name));
this.empFrm.valueChanges.subscribe(data => this.onValueChanged(data));
this.onValueChanged();
if (this.action == "create")
this.empFrm.reset();
else
this.empFrm.setValue(this.employee);
this.SetControlsState(this.action == "delete" ? false : true);
}
onValueChanged(data?: any) {
if (!this.empFrm) { return; }
const form = this.empFrm;
for (const field in this.formErrors) {
this.formErrors[field] = '';
const control = form.get(field);
if (control && control.dirty && !control.valid) {
const messages = this.validationMessages[field];
for (const key in control.errors) {
this.formErrors[field] += messages[key] + ' ';
}
}
}
}
formErrors = {
'EmployeeId': '',
'EmpName': '',
'Address': '',
'EmailId': '',
'MobileNo': '',
'DeptName': '',
'DateOfBirth': '',
'PineCode': ''
};
validationMessages = {
'EmpName': {
'maxlength': 'Employee Name cannot be more than 50 characters long.',
'required': 'Employee Name is required.'
},
'Address': {
'maxlength': 'Last Name cannot be more than 500 characters long.',
'required': 'Address is required.'
},
'EmailId': {
'email': 'Invalid email format.',
'required': 'Email is required.'
},
'MobileNo': {
'required': 'Mobile Number is required.'
}
,
'DeptName': {
'required': 'Department is required.'
}
,
'PineCode': {
'required': 'Pine Code is required.'
}
};
onSubmit(formData: any) {
switch (this.action) {
case "create":
this._employeeService.post(MyApiUrl.InsertEmpDetails, formData._value).subscribe(
data => {
this.dialogRef.close(data);
},
error => {
this.dialogRef.close("error");
}
);
break;
case "update":
this._employeeService.put(MyApiUrl.UpdateEmpDetails, formData._value.EmployeeId, formData._value).subscribe(
data => {
this.dialogRef.close(data);
},
error => {
this.dialogRef.close("error");
}
);
break;
case "delete":
this._employeeService.delete(MyApiUrl.DeleteEmpDetails, formData._value.EmployeeId).subscribe(
data => {
this.dialogRef.close(data);
},
error => {
this.dialogRef.close("error");
}
);
break;
}
}
SetControlsState(isEnable: boolean) {
isEnable ? this.empFrm.enable() : this.empFrm.disable();
}
}
Now, we will add manageEmployee.component.html in the Components folder, go to the Components folder and right-click >> add >> TypeScript File >> select file and change manageEmployee.component.html of the file and write below code.
<form novalidate (ngSubmit)="onSubmit(empFrm)" [formGroup]="empFrm">
<div style="padding:50px;width:500px;border:2px solid darkblue">
<div>
<h1 md-dialog-title><span><md-icon>create</md-icon>{{modalTitle}}</span></h1>
</div>
<div style="padding-bottom:1px;background-color:#d8d8d8"></div>
<div>
<div md-dialog-content class="md-dialog-container">
<div class="frm-ctrl">
<md-input-container>
<input mdInput placeholder="Employee Name" formControlName="EmpName">
</md-input-container>
<div *ngIf="formErrors.EmpName" class="text-danger">
{{ formErrors.EmpName }}
</div>
</div>
<div class="frm-ctrl">
<md-input-container>
<input mdInput placeholder="Address" formControlName="Address">
</md-input-container>
<div *ngIf="formErrors.Address" class="text-danger">
{{ formErrors.Address }}
</div>
</div>
<div class="frm-ctrl">
<md-input-container>
<input type="email" mdInput placeholder="EmailId" formControlName="EmailId">
</md-input-container>
<div *ngIf="formErrors.EmailId" class="text-danger">
{{ formErrors.EmailId }}
</div>
</div>
<div class="line_ctrl">
<md-input-container class="example-full-width">
<input mdInput placeholder="Mobile Number" #postalCode maxlength="10" formControlName="MobileNo">
</md-input-container>
<div *ngIf="formErrors.MobileNo" class="text-danger">
{{ formErrors.MobileNo }}
</div>
</div>
<div class="line_ctrl">
<md-input-container>
<input mdInput placeholder="Department Name" [mdAutocomplete]="auto" formControlName="DeptName">
</md-input-container>
<md-autocomplete #auto="mdAutocomplete">
<md-option *ngFor="let dept of filteredDepts | async" [value]="dept">
{{ dept }}
</md-option>
</md-autocomplete>
<div *ngIf="formErrors.DeptName" class="text-danger">
{{ formErrors.DeptName }}
</div>
</div>
<div class="frm-ctrl">
<md-input-container style="width:50%">
<input mdInput [mdDatepicker]="picker" placeholder="Date of Birth" formControlName="DateOfBirth">
<button mdSuffix [mdDatepickerToggle]="picker"></button>
</md-input-container>
<md-datepicker #picker></md-datepicker>
<div *ngIf="formErrors.DateOfBirth" class="text-danger">
{{ formErrors.DateOfBirth }}
</div>
</div>
<div class="line_ctrl">
<md-input-container class="example-full-width">
<input mdInput placeholder="Pine Code" #postalCode maxlength="6" formControlName="PineCode">
</md-input-container>
<div *ngIf="formErrors.PineCode" class="text-danger">
{{ formErrors.PineCode }}
</div>
</div>
</div>
</div>
<md-dialog-actions class="md-dialog-footer" align="center">
<button color="warn" type="button" md-raised-button (click)="dialogRef.close()">Cancel</button>
<button type="submit" color="primary" [disabled]="empFrm.invalid" md-raised-button>{{modalBtnTitle}}</button>
</md-dialog-actions>
</div>
</form>
Now go to the app folder and right click >> add >> New Folder >> select folder and change name filter of the new folder and after that add employee.pipe.ts file. and write below code.
import { PipeTransform, Pipe } from '@angular/core';
import { IEmployee } from '../Models/employee';
@Pipe({
name: 'employeeFilter'
})
export class EmployeeFilterPipe implements PipeTransform {
transform(value: IEmployee[], filter: string): IEmployee[] {
filter = filter ? filter.toLocaleLowerCase() : null;
return filter ? value.filter((app: IEmployee) =>
app.EmpName != null && app.EmpName.toLocaleLowerCase().indexOf(filter) != -1
|| app.Address != null && app.Address.toLocaleLowerCase().indexOf(filter) != -1
) : value;
}
}
after that add search.component.ts file. and write the below code.
import { Component, Input, Output, EventEmitter } from '@angular/core';
@Component({
selector: 'search-list',
template: `<div class="form-inline">
<div class="form-group">
<label><h3>{{title}}</h3></label>
</div>
<div class="form-group">
<div class="col-lg-12">
<input class="input-lg" placeholder="Enter any text to filter" (paste)="getPasteData($event)" (keyup)="getEachChar($event.target.value)" type="text" [(ngModel)]="listFilter" /><img width="50" height="50" src="../../images/search-button-round.png" class="cross-btn" (click)="clearFilter()" *ngIf="listFilter"/>
</div>
</div>
<div class="form-group">
<div *ngIf='listFilter'>
<div class="h3 text-muted">Filter by: {{listFilter}}</div>
</div>
</div>
</div>`
})
export class SearchComponent {
listFilter: string;
@Input() title: string;
@Output() change: EventEmitter<string> = new EventEmitter<string>();
getEachChar(value: any) {
this.change.emit(value);
}
clearFilter() {
this.listFilter = null;
this.change.emit(null);
}
getPasteData(value: any) {
let pastedVal = value.clipboardData.getData('text/plain');
this.change.emit(pastedVal);
value.preventDefault();
}
}
Again we will add app.routing.ts, go to the app folder and right-click >> add >> TypeScript File >> select file and change name app.routing.ts of the file and write below code.
import { ModuleWithProviders } from '@angular/core';
import { Routes, RouterModule } from '@angular/router';
import {EmployeeComponent } from './components/employee.component';
import { HomeComponent } from './components/home.component';
const appRoutes: Routes = [
{ path: '', redirectTo: 'home', pathMatch: 'full' },
{ path: 'home', component: HomeComponent },
{ path: 'employee', component: EmployeeComponent }
];
export const routing: ModuleWithProviders =
RouterModule.forRoot(appRoutes);
Again we will add app.component.ts, go to the app folder and right-click >> add >> TypeScript File >> select file and change name app.component.ts of the file and write below code.
import { Component } from "@angular/core"
import {
Router,
// import as RouterEvent to avoid confusion with the DOM Event
Event as RouterEvent,
NavigationStart,
NavigationEnd,
NavigationCancel,
NavigationError
} from '@angular/router';
@Component({
selector: "emp-app",
template: `
<div>
<nav class='navbar navbar-default'>
<div class='container-fluid'>
<button md-icon-button [mdMenuTriggerFor]="menu">
<md-icon>more_vert</md-icon> Menu
</button>
<md-menu #menu="mdMenu">
<button md-menu-item [routerLink]="['home']">
<md-icon>home</md-icon>
<span>Home</span>
</button>
<button md-menu-item [routerLink]="['employee']">
<md-icon>group</md-icon>
<span>Employee Details</span>
</button>
</md-menu>
</div>
</nav>
<div class='container'>
<router-outlet><div class="loading-overlay" *ngIf="loading">
<!-- show something fancy here, here with Angular 2 Material's loading bar or circle -->
<md-progress-bar mode="indeterminate"></md-progress-bar>
</div></router-outlet>
</div>
</div>
`
})
export class AppComponent {
loading: boolean = true;
constructor(private router: Router) {
router.events.subscribe((event: RouterEvent) => {
this.navigationInterceptor(event);
});
}
// Shows and hides the loading spinner during RouterEvent changes
navigationInterceptor(event: RouterEvent): void {
if (event instanceof NavigationStart) {
this.loading = true;
}
if (event instanceof NavigationEnd) {
setTimeout(() => { this.loading = false; }, 1000)
// this.loading = false;
}
// Set loading state to false in both of the below events to hide the spinner in case a request fails
if (event instanceof NavigationCancel) {
this.loading = false;
}
if (event instanceof NavigationError) {
this.loading = false;
}
}
}
Now, we will add app.module.ts, go to the app folder and right-click >> add >> TypeScript File >> select file and change name app.module.ts of the file and write below code.
import { NgModule, ErrorHandler } from '@angular/core';
import { APP_BASE_HREF } from '@angular/common';
import { BrowserModule } from '@angular/platform-browser';
import { BrowserAnimationsModule } from '@angular/platform-browser/animations';
import { MaterialModule, MdNativeDateModule } from '@angular/material';
import { FormsModule, ReactiveFormsModule } from '@angular/forms';
import { AppComponent } from './app.component';
import { HttpModule } from '@angular/http';
import { routing } from './app.routing';
import { EmployeeComponent } from './components/employee.component';
import { HomeComponent } from './components/home.component';
import { EmployeeService } from './Service/employee.service'
import { EmployeeFilterPipe } from './filter/employee.pipe'
import { SearchComponent } from './filter/search.component';
import { manageEmployee } from './components/manageEmployee.component';
@NgModule({
imports: [BrowserModule, ReactiveFormsModule, HttpModule, routing, FormsModule,
BrowserAnimationsModule,
MaterialModule,
MdNativeDateModule],
declarations: [AppComponent, EmployeeComponent, HomeComponent, EmployeeFilterPipe, SearchComponent, manageEmployee],
providers: [{ provide: APP_BASE_HREF, useValue: '/' }, EmployeeService],
entryComponents: [manageEmployee],
bootstrap: [AppComponent]
})
export class AppModule { }
Step 9
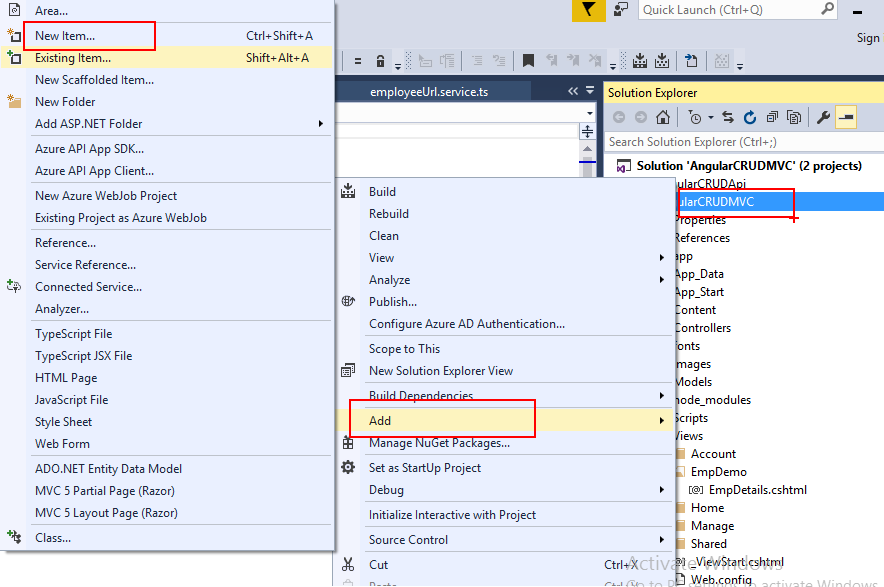
After completed Angular code, we will go in controller folder and a controller. Right click >>Add >> Controller >> MVC5 Controller Empty >> Add
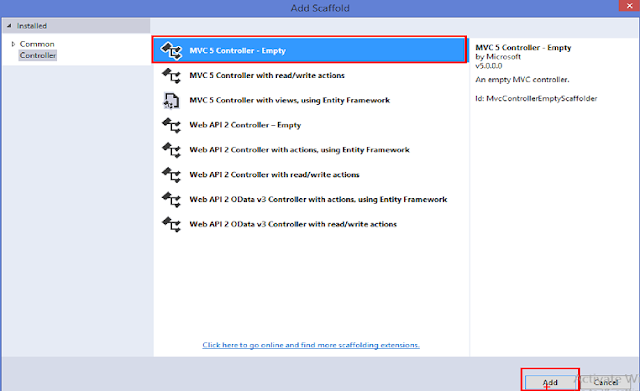
Click Add Button
After click the add button will check and also an image folder for add some image.

After click the add button will check and also an image folder for add some image.
After that add an action method in EmpDemo controller for display our output
public ActionResult EmpDetails()
{
return View();
}
After that right click and add a view and write below code.
<script src="/node_modules/core-js/client/shim.min.js"></script>
<script src="/node_modules/zone.js/dist/zone.js"></script>
<script src="/node_modules/systemjs/dist/system.src.js"></script>
<script src="/systemjs.config.js"></script>
<link href="/node_modules/%40angular/material/prebuilt-themes/indigo-pink.css" rel="stylesheet" />
<link href="https://fonts.googleapis.com/icon?family=Material+Icons" rel="stylesheet">
<script>
System.import('app').catch(function (err) { console.error(err); });
</script>
<body>
<emp-app>Loading…</emp-app>
</body>
Step 10
Let us run the project but we have to run both projects at one time so for this, so we have to set some changes.
Right-click on the solution project and go to properties. There, check the "Multiple startup projects" option and click "Apply".

Now, we can see the output. It is not giving the expected result but some error.
This error is called CORS. So first, we have to know what CORS is and how to resolve this problem.


According to Wikipedia,
Cross-origin resource sharing (CORS) is a mechanism that allows restricted resources (e.g. fonts) on a web page to be requested from another domain outside the domain from which the first resource was served.
For more details click this link.
Now, let us learn how to resolve this problem.
So for this, we have to download CORS in the Web API project. Go to NuGet Package Manager and download the following file.
After that, I goto the App_Start folder in Web API project and then WebApiConfig.cs class. Here, modify the Register method with the below code.

var cors = new EnableCorsAttribute("*", "*", "*");// origins, headers, methods
config.EnableCors(cors);
Now, save changes and run the project to see the final output.
Now click Employee Details

Now click Add Employee

In the above Image perform of Autocomplete. and now insert full records

After that click Add button and see the result

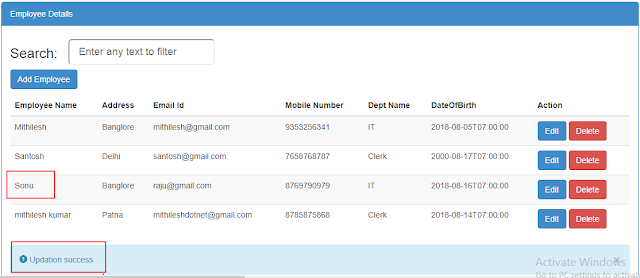
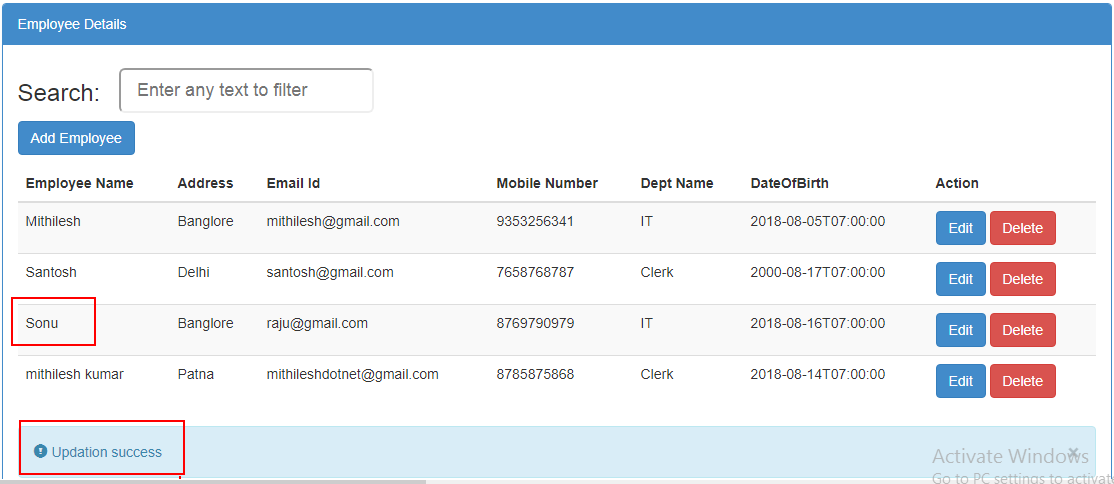
Now check the edit functionality
After click Update button
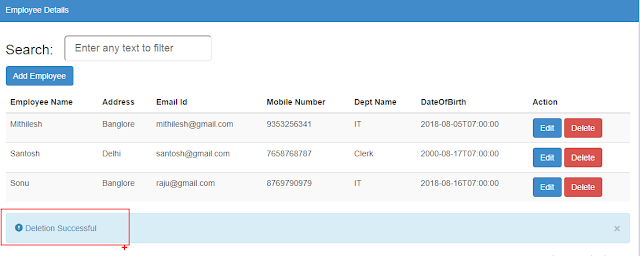
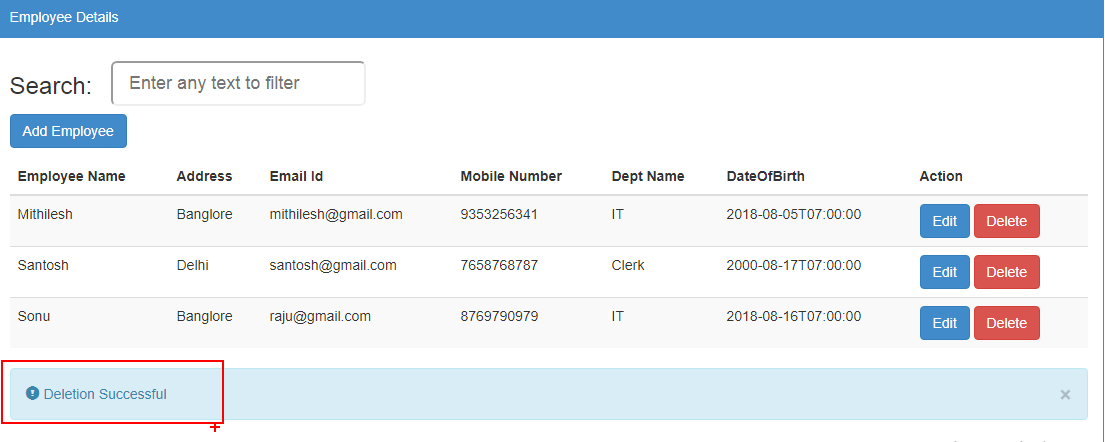
Now check delete functionality
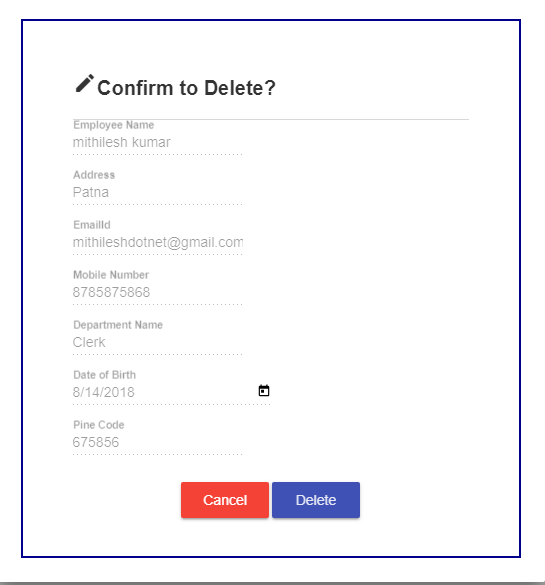
After click delete button
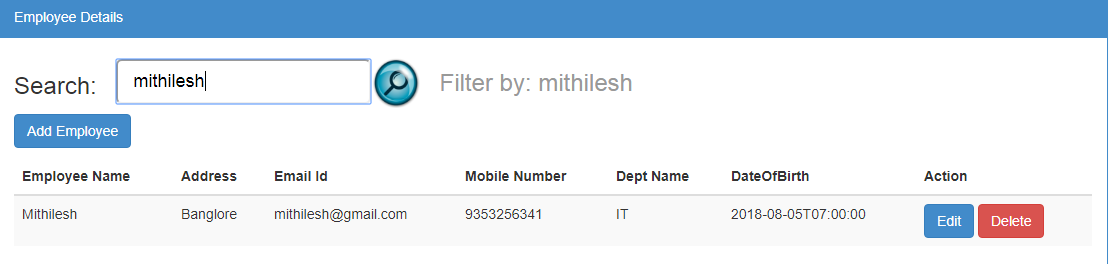
Now check search functionality
Thank you reading this article.
5 comments:
after running the solution i am getting this below error.Please Provide the solution.
> angular-quickstart@1.0.0 build D:\Raju\AngularCrudApi\AngularCrudMvc
> tsc -p src/
error TS5058: The specified path does not exist: 'src/'
npm ERR! code ELIFECYCLE
npm ERR! errno 1
npm ERR! angular-quickstart@1.0.0 build: `tsc -p src/`
npm ERR! Exit status 1
npm ERR!
npm ERR! Failed at the angular-quickstart@1.0.0 build script.
npm ERR! This is probably not a problem with npm. There is likely additional logging output above.
npm ERR! A complete log of this run can be found in:
npm ERR! C:\Users\v-avkum\AppData\Roaming\npm-cache\_logs\2019-02-27T10_40_14_816Z-debug.log
npm ERR! code ELIFECYCLE
npm ERR! errno 1
npm ERR! angular-quickstart@1.0.0 prestart: `npm run build`
npm ERR! Exit status 1
npm ERR!
npm ERR! Failed at the angular-quickstart@1.0.0 prestart script.
npm ERR! This is probably not a problem with npm. There is likely additional logging output above.
npm ERR! A complete log of this run can be found in:
npm ERR! C:\Users\v-avkum\AppData\Roaming\npm-cache\_logs\2019-02-27T10_40_14_897Z-debug.log
D:\Raju\AngularCrudApi\AngularCrudMvc>
I think you have not installed node_module.So first you have to install Angular cli using nmp.
You can also follow latest in below link
https://mithileshdotnet.blogspot.com/2019/01/how-to-perform-crud-operation-using-web.html
Good Article. Thanks for providing the such a wonderful blog which helps to clarify my doubts. Keep Blogging!!! extended warranty
Post a Comment