Introduction
In this article, I'm going to create an application to get user details in a model popup in ReactJS with Axios using Web API with the help of an example SQL Server database as back-end. A Web API is used to provide data connectivity between the database and the front-end application for building RESTful services.
On the UI side, I will use bootstrap to create a rich, interactive, device-independent user experience so as to building a beautiful UI. In this example, I will bind user details in a short format ( i.e. will see only necessary columns) and when we want to see the records in detail of a particular user, then will click a specific row. After that, it will show records in a popup window and then clicking the Close button will close the popup. Let us see step by step.
I'm using Visual Studio Code as a tool to build my application. If you don't have Visual Studio Code in your system, then first you have to download and install. Here is the Visual Studio Code download link: Download Visual Studio Code Editor.
Prerequisites
- Visual Studio
- SQL Server
- JavaScript version > 10
- React
- React Axios
- Visual Sudio Code
- Bootstrap
- React-bootstrap
Step 1 - Create a database and table
Create a database. Open SQL Server and create a new database and table. As you can see from the following query, I have created the database tables called Branch Details and Company Details.
UserDetails
CREATE TABLE [dbo].[UserDetails](
[UserId]
[int] IDENTITY(1,1) NOT NULL,
[FirstName]
[varchar](50) NULL,
[LastName]
[varchar](50) NULL,
[EmailId]
[varchar](100) NULL,
[MobileNo]
[varchar](50) NULL,
[Address]
[varchar](500) NULL,
[PinCode]
[char](10) NULL,
[CompanyName]
[varchar](100) NULL,
[Gender]
[nchar](20) NULL,
[Country]
[varchar](50) NULL,
[State]
[varchar](100) NULL,
[City]
[varchar](100) NULL,
CONSTRAINT [PK_UserDetails] PRIMARY
KEY CLUSTERED
(
[UserId]
ASC
)WITH (PAD_INDEX = OFF, STATISTICS_NORECOMPUTE =
OFF, IGNORE_DUP_KEY = OFF, ALLOW_ROW_LOCKS = ON, ALLOW_PAGE_LOCKS = ON) ON [PRIMARY]
) ON [PRIMARY]
GO
SET ANSI_PADDING OFF
GO
SET IDENTITY_INSERT [dbo].[UserDetails] ON
INSERT [dbo].[UserDetails]
VALUES (2, N'Mithilesh', N'kumar', N'mithilesh@gmail.com', N'3049583043', N'hyderabad', N'039458 ', N'Microsoft', N'Male, ', N'India', N'Telangana', N'Hyderabad')
INSERT [dbo].[UserDetails]
VALUES (23, N'Suresh', N'Sura', N'suresh@gmail.com', N'9485034934', N'pune', N'346344 ', N'TSC', N'Male', N'India', N'Karnatak', N'Banglore')
INSERT [dbo].[UserDetails]
VALUES (24, N'Mona', N'Sharma', N'mona@gmail.com', N'0982349335', N'Pune', N'893484 ', N'HCL', N'Female', N'India', N'Mahrastra', N'Pune')
INSERT [dbo].[UserDetails]
VALUES (25, N'Neha', N'Bharti', N'neha@gmail.com', N'2495304444', N'Chennai', N'938459 ', N'Bipro', N'Female', N'India', N'TamilNadu', N'Chennai')
SET IDENTITY_INSERT [dbo].[UserDetails] OFF
Note
You can choose the size of the columns according to your requirements.
You can choose the size of the columns according to your requirements.
Step 2 - Create a Web API Project
Now, we will create a Web API with the functionality of binding records from a database. Go to Visual Studio >> File >> New >> Project, and select Web Application. after that, click OK and you will see the templates. Select the Web API template.
Now, we will create a Web API with the functionality of binding records from a database. Go to Visual Studio >> File >> New >> Project, and select Web Application. after that, click OK and you will see the templates. Select the Web API template.

Click OK.

Click OK.
Step 3 - Add ADO.NET Entity Data Model
Now, select the Models folder. Right-click on it and go to Add >> New Item >> select Data in left panel >> ADO.NET Entity Data Model.

Click "Add".
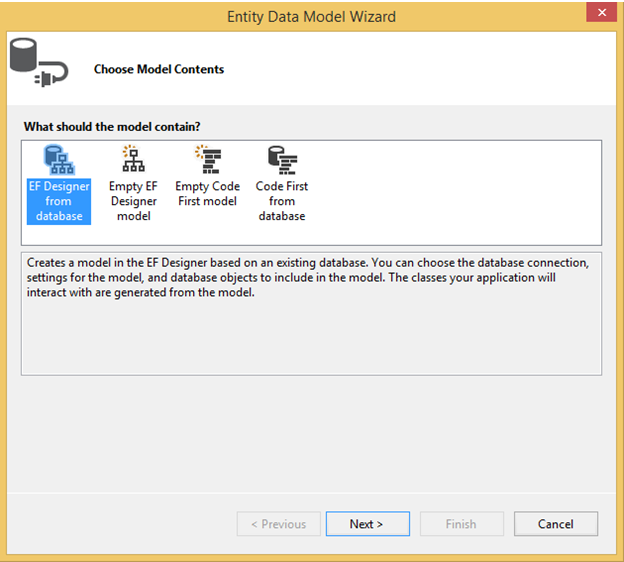
Click the "Next" button.

Give server name of SQL Server and its credentials. Then, select the database and test connection. Click OK.

Click Next button

Select tables and click the "Finish" button.
Let us see our table entity.

Step 4 - Add API controller logic
Go to the Controller folder in the API Application and right-click >> Add >> Controller >> Select Web API 2 Controller-Empty.

Click the "Add" button.
Now, we will write the logic for performing the CRUD operation. We will go to the Controller class and set the routing to make it more user-friendly by writing the below code.
using System;
using System.Linq;
using System.Web.Http;
using ReactCRUDApi.Models;
namespace ReactCRUDApi.Controllers
{
[RoutePrefix("Api/User")]
public class UserController : ApiController
{
ReactDBEntities objEntity = new ReactDBEntities();
[HttpGet]
[Route("GetUserDetails")]
public IQueryable<UserDetail> GetEmaployee()
{
try
{
return objEntity.UserDetails;
}
catch (Exception)
{
throw;
}
}
[HttpGet]
[Route("GetUserDetailsById/{userId}")]
public IHttpActionResult GetUserById(string userId)
{
UserDetail objUser = new UserDetail();
if (userId != "undefined")
{
int ID = Convert.ToInt32(userId);
try
{
objUser =
objEntity.UserDetails.Find(ID);
if (objUser == null)
{
return NotFound();
}
}
catch (Exception)
{
throw;
}
}
return Ok(objUser);
}
}
}
Now, our API has been completed and As you may see from
the above code, it has the functionality to add, replace, update, and delete
records to the table.
Step 5.Create and Install React js
Now we will create a
react project thought below command. But before that just check Node and NPM
installed or not. And also We are using Visual
Studio code as writing angular code for UI application so first, make sure it
installed or not. If you have not installed then go to this link for
download.
Let's create a react
project to open a new terminal and run the following command to install and
create a react project.
npx
create-react-app modelexample
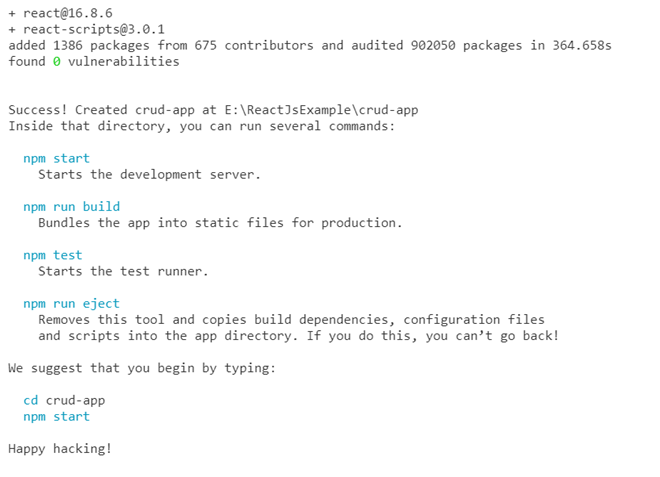
The react project has been created successfully.
Step 6 - Set Visual Studio Code for React code
Open Visual Studio Code and open the project inside it.
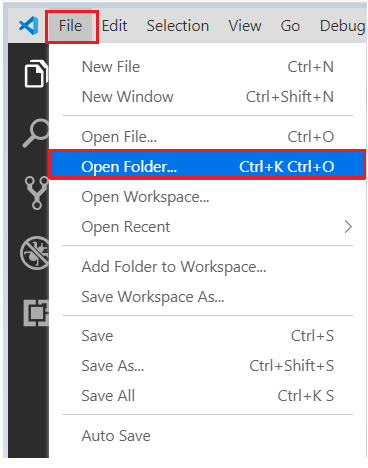
Select the project folder.


Step 7 - Check React dependency
Go to the package.json file and check for React dependency.

Step 8 - Generate React Component
Go inside the src folder and create a new folder. Here, I have created a ModelDemo folder and created 2 files - Action.js and Modal.js.

Step 9 - Install bootstrap
Now, we will install bootstrap for building a beautiful UI of our React application.
npm install bootstrap --save
And next, we will install react-bootstrap bootstrap for design table, button, etc
npm install react-bootstrap bootstrap
Step 10 - Install Axios library
Axios is a modern and promise based JavaScript HTTP client library which works asynchronously and allows us to make HTTP calls and consume REST API.
Now, let's install Axios in our React project using the following command.
npm install --save axios
Step 11 - Write code in the JS file to perform our operation
Now, we will write our logic for performing operation. First, we will write code to get user details.
Go inside the ModelDemo folder and open Modal.js file. In this file, we will create a model for populate particular records and design our popup window. works asynchronously and allows us to make HTTP calls and consume REST API.
import React from 'react';
import PropTypes from 'prop-types';
class Modal extends React.Component {
render() {
if(!this.props.show) {
return null;
}
const backdropStyle = {
position: 'fixed',
top: 50,
bottom: 0,
left: 0,
right: 0,
backgroundColor: 'rgba(0,0,0,0.3)',
padding: 50,
};
const model = {
position: 'relative',
top: 0,
left: 0,
display: 'table',
Width: '100%',
height: '30%',
overflow: 'hidden',
outline: 0,
backgroundColor: '#fff',
margin: '0 auto',
padding: 10,
maxWidth: 500,
minHeight: 300,
};
return (
<div className="backdrop" style={backdropStyle}>
<div className="modal" style={model}>
{this.props.children}
<div className="footer">
<button className="btn-warning" onClick={this.props.onClose}>
Close
</button>
</div>
</div>
</div>
);
}
}
Modal.propTypes = {
onClose: PropTypes.func.isRequired,
show: PropTypes.bool,
children: PropTypes.node
};
export default Modal;
Now again go inside the ModelDemo folder and open
Action.js file and First import necessary library and then write below code and
in a file, I will create two methods first for select short details and a second
method for select particular user detail. And in render section will take a table
for display user short details and Model for display particular details in
popup
import React, { Component } from 'react';
import Modal from './Modal';
import axios from 'axios';
import { Table,Button } from 'react-bootstrap';
const apiUrl = 'http://localhost:51971/Api/User';
class App extends Component {
constructor(props) {
super(props);
this.state = {
isOpen: false,
error: null,
users: [],
userData: {},
response: {}
};
}
componentDidMount(){
axios.get(apiUrl + '/GetUserDetails').then(response => response.data).then(
(result)=>{
this.setState({
users:result
});
},
(error)=>{
this.setState({error});
}
)
}
toggleModal(userId) {
axios.get(apiUrl + "/GetUserDetailsById/" + userId).then(response => response.data).then(result => {
this.setState({
userData: result
});
},
(error) => {
this.setState({ error });
}
)
this.setState({
isOpen: !this.state.isOpen
});
}
render() {
const{users}=this.state;
return (
<div className="App">
<div >
<div className="row">
<div className="col-md-3"></div>
<div className="col-md-6">
<Table className="table">
<thead className="btn-primary">
<tr>
<th>First Name</th>
<th>EmailId</th>
<th>MobileNo</th>
<th>Action</th>
</tr>
</thead>
<tbody>
{users.map(user => (
<tr key={user.UserId}>
<td>{user.FirstName}</td>
<td>{user.EmailId}</td>
<td>{user.MobileNo}</td>
<td><Button variant="info" onClick={()=>this.toggleModal(user.UserId)} >Details</Button>
</td>
</tr>
))}
</tbody>
</Table>
</div>
<div className="col-md-3"></div>
</div>
</div>
<Modal show={this.state.isOpen}
onClose={()=>this.toggleModal(this.UserId)}>
<Table className="table">
<thead>
<tr className="btn-primary"><th colSpan="2">User Details</th></tr>
</thead>
<tbody>
<tr>
<th>First Name </th><td>{this.state.userData.FirstName}</td>
</tr> <tr>
<th>Last Name </th><td>{this.state.userData.LastName}</td>
</tr> <tr>
<th>EmailId </th><td>{this.state.userData.EmailId}</td>
</tr> <tr>
<th>Mobile No </th><td>{this.state.userData.MobileNo}</td>
</tr> <tr>
<th>Address </th><td>{this.state.userData.Address}</td>
</tr> <tr>
<th>PinCode </th><td>{this.state.userData.PinCode}</td>
</tr>
<tr>
<th>Company Name </th><td>{this.state.userData.CompanyName}</td>
</tr>
<tr>
<th>Gender </th><td>{this.state.userData.Gender}</td>
</tr>
<tr>
<th>Country </th><td>{this.state.userData.Country}</td>
</tr>
<tr>
<th>State </th><td>{this.state.userData.State}</td>
</tr>
<tr>
<th>City </th><td>{this.state.userData.City}</td>
</tr>
</tbody>
</Table>
</Modal>
</div>
);
}
}
export default App;
And Last open index.js file and First import necessary
library and then write below code.
import React from 'react';
import './App.css';
import Action from './ModelDemo/Action';
import '../node_modules/bootstrap/dist/css/bootstrap.min.css';
function App() {
return (
<div className="App">
<Action/>
</div>
);
}
export default App;
Finally, Our coding part also
has been completed.
Step 16. Set CORS (Cross-Origin Resource
Sharing)
Go to the Web API
project.
Download a NuGet package for
CORS. Go to NuGet Package Manager and download the following file.
After that, go to the App_Start a folder in Web API project and open WebApiConfig.cs class. Here, modify the
Register method with the below code.

Add namespace
using System.Web.Http.Cors;
After that, add the below code inside Register
method.
var cors = new EnableCorsAttribute("*", "*", "*");
config.EnableCors(cors);
Step 17. Run
We have completed all
the needed code functionality for our functionality. Before running the
application, first, make sure to save your work.
Now, let's run the app
and see how it works.
Open TERMINAL and
write the following command to run the program.
npm start
The output looks like
the following image. It's a stunning UI that's been created.

Now click on details
button.

Now, take a look at the final operation.
Conclusion
We have learned how to perform an operation to get the details of a particular user in popup or model dialogs in React and Axios using Web API and SQL Server. We started by installing and creating the create-react-app then used it to create our React project. Next, we installed bootstrap and react-bootstrap in the React application. After that, we installed the Axios client library and used the get() details and particular get details methods to the HTTP request.
I hope you enjoyed this article. Always willing to reply to any query and comment.
1 comment:
This was truly awesome. Thanks so much for this..!
Microsoft Azure DevOps Online Training
Microsoft Azure DevOps training hyderabad
Azure DevOps online training in hyderabad
Post a Comment