Hi, Today I will discuss about, Perform CRUD operation in MVC Core using Web Api and Angular 7.In duration perform operation we will see many thing.Let us see step by step.


After that click Add button then give the class name and open class and write below code for perform CRUD operation using API.
EmployeeAPIController.cs
Now code has been completed.Then we will go next-
How to set the Swagger in Startup class.
Step 9
First we have to Install Swashbuckle.AspNetCore. for use Swagger. We can install through command tool or NUGet Package. If we use command tool then we can use below command for install.
PM> Install-Package Swashbuckle.AspNetCore
And when using NuGet Package then right click of the our project and select Mange NuGet Package and then type Swashbuckle.AspNetCore and search and install like below Image.

Step 10
Now, We have to set some configuration in startup class.
Open startup class and add below code in side ConfigureServices Method.
Again open Configure in Startup class and add below code in side Configure method.


So, again go to the TERMINAL and go our angular project location using below command


Now add css code for validation message open styles.css and write bellow css code.


open employee-details.service.ts in side shared folder and write below code
This is showing notifications and alerts is a common use case that we encounter while developing any web application.
- How to create a project in MVC Core.
- How to connect with database using code first approach.
- How to create API in MVC core.
- How to set the Swagger in Startup class.
- How to test api in swagger.
- How to create Angular 7 project in Visual studio code.
- How to create service in Angular 7
- How to check client side validation in Angular 7
- How to perform CRUD in Angular 7

So First, We will see how to create a project in MVC Core
Step 1
- Install visual studio 2017.
- Open visual studio
- File
- New
- Project

Step 2

- Choose .NET Core in left Panel.
- Select ASP.NET Core Web Application option.
- Choose name and Give as your requirement or meaning full.
- Click OK button
Step 3

- Select ASP.NET Core version on top dropdown option.
- Select API.
- Unchecked configure for HTTPS if you don't have need.
- Click Ok button
Step 4
After click ok button we will see our project structure below is default project structure.

Our project creation has completed now we go next.
How to connect with database using code first approach.
Step 5
Here, First we have to set connection string.In core, We will set connection string in appsetting.json file in our default solution.
{
"Logging": {
"LogLevel": {
"Default": "Warning"
}
},
"AllowedHosts": "*",
"ConnectionStrings": {
"SQLConnection": "Server
=PC;Database=EmployeeDB;User Id=sa;Password=password"
}
}
Step 5
Now, Right click our solution and add a new folder and give the name Models.
In models folder we will add model class and DbContext class.
First we will add Model class.Here we are doing functionality of crud operation of employee records so we can take a employee class.
Right click of the models folder and select add option then select class option and add a class and give the name Employee. Right click of the models folder and select add option then select class option and add a class and give then EmployeDbContext class because we will declare DbContext in side this class.We can see below our class structure.

Step 6
Now, Open Employee class and declare employee related properties.
Employee.cs
public class Employee
{
public int EmployeeId { get; set; }
public string FirstName { get; set; }
public string LastName { get; set; }
public string Email { get; set; }
public string MobileNo { get; set; }
public string Address { get; set; }
public string PineCode { get; set; }
}
We can see this our employee properties.And here we are using code first approach so we have to set data annotation like string size of the column, Validation,Display Name,Primary key etc
For this, first we have to import namespace.
using
System.ComponentModel.DataAnnotations;
using
System.ComponentModel.DataAnnotations.Schema;
And then set the annotation.
[Table("tbl_Employee")]
public class Employee
{
[Key]
public int EmployeeId { get; set; }
[Required]
[Column(TypeName = "varchar(100)")]
public string FirstName { get; set; }
[Required]
[Column(TypeName = "varchar(100)")]
public string LastName { get; set; }
[Required]
[Column(TypeName = "varchar(100)")]
public string Email { get; set; }
[Required]
[Column(TypeName = "varchar(10)")]
public string MobileNo { get; set; }
[Required]
[Column(TypeName = "nvarchar(500)")]
public string Address { get; set; }
[Required]
[Column(TypeName = "char(6)")]
public string PineCode { get; set; }
}
Now, Open EmployeeDbContex class and write below code.
EmployeeDbContext.cs
we have to import namespace.
using Microsoft.EntityFrameworkCore;
Now inherit from DBContext class
public class EmployeeDbContext: DbContext
{
public EmployeeDbContext(DbContextOptions<EmployeeDbContext>
options) : base(options)
{
}
public DbSet<Employee>
employees{ get; set; }
}
Step 7
Now we have to inject DBContext class and Connection configuration in ConfigureServices method in startup class.
Now, we generate database with table using data migration.
So first, go to Tools >> NuGet Package Manager >> Package Manager Console.
We have to enable migration for that execute following Command.
enable-migrations
Step 7
Now we have to inject DBContext class and Connection configuration in ConfigureServices method in startup class.
public void ConfigureServices(IServiceCollection
services)
{
services.AddMvc()
.SetCompatibilityVersion(CompatibilityVersion.Version_2_1)
.AddJsonOptions(options => {
var resolver =
options.SerializerSettings.ContractResolver;
if (resolver != null)
(resolver as
DefaultContractResolver).NamingStrategy = null;
});
services.AddDbContext<EmployeeDbContext>(options =>
options.UseSqlServer(Configuration.GetConnectionString("SQLConnection")));
}
Now, we generate database with table using data migration.
So first, go to Tools >> NuGet Package Manager >> Package Manager Console.
We have to enable migration for that execute following Command.
enable-migrations
then add a migration for that execute following Command
Add-Migration InitialMigration

To see these changes in database, execute following update command.
Add-Migration InitialMigration

To see these changes in database, execute following update command.
update-database

Now Check in Sql Server

Finally Database creation has done now we will go next
How to create API in MVC core.
Step 8
Now we will in controller folder and right click >> Select Add option >> Select Controller option.Select API Controller - Empty >> Add

After that click Add button then give the class name and open class and write below code for perform CRUD operation using API.
EmployeeAPIController.cs
[Route("api/[controller]")]
[ApiController]
public class EmployeeAPIController : ControllerBase
{
private readonly EmployeeDbContext
_context;
public
EmployeeAPIController(EmployeeDbContext context)
{
_context = context;
}
[HttpGet]
[Route("AllEmployeeDetails")]
public async
Task<ActionResult<IEnumerable<Employee>>>
GetEmployeeDetails()
{
return await _context.employee.ToListAsync();
}
[HttpPut]
[Route("UpdateEmpDetails/{id}")]
public async
Task<IActionResult> UpdateEmpDetails([FromRoute] int id, [FromBody]
Employee employees)
{
if (!ModelState.IsValid)
{
return BadRequest(ModelState);
}
if (id != employees.EmployeeId)
{
return BadRequest();
}
_context.Entry(employees).State =
EntityState.Modified;
try
{
await _context.SaveChangesAsync();
}
catch (DbUpdateConcurrencyException)
{
if (!EmpDetailsExists(id))
{
return NotFound();
}
else
{
throw;
}
}
return NoContent();
}
[HttpPost]
[Route("InsertEmpDetails")]
public async
Task<IActionResult> PostEmployeeDetails([FromBody] Employee employees)
{
try
{
if (!ModelState.IsValid)
{
return
BadRequest(ModelState);
}
_context.employee.Add(employees);
await _context.SaveChangesAsync();
}
catch (Exception ex)
{
ex.ToString();
}
return CreatedAtAction("GetEmployeeDetails", new { id =
employees.EmployeeId }, employees);
}
[HttpDelete("DeleteEmp/{id}")]
public async
Task<IActionResult> DeleteEmpDetails([FromRoute] int id)
{
if (!ModelState.IsValid)
{
return BadRequest(ModelState);
}
var empDetails = await _context.employee.FindAsync(id);
if (empDetails == null)
{
return NotFound();
}
_context.employee.Remove(empDetails);
await _context.SaveChangesAsync();
return Ok(empDetails);
}
private bool EmpDetailsExists(int id)
{
return _context.employee.Any(e => e.EmployeeId
== id);
}
}
Now code has been completed.Then we will go next-
How to set the Swagger in Startup class.
Step 9
First we have to Install Swashbuckle.AspNetCore. for use Swagger. We can install through command tool or NUGet Package. If we use command tool then we can use below command for install.
PM> Install-Package Swashbuckle.AspNetCore
And when using NuGet Package then right click of the our project and select Mange NuGet Package and then type Swashbuckle.AspNetCore and search and install like below Image.

Step 10
Now, We have to set some configuration in startup class.
Open startup class and add below code in side ConfigureServices Method.
services.AddSwaggerGen(o =>
{
o.DescribeAllEnumsAsStrings();
o.SwaggerDoc("v1", new Info { Title = "CRUD API", Version = "v1", TermsOfService = "Terms of
Service" });
});
Again open Configure in Startup class and add below code in side Configure method.
public void Configure(IApplicationBuilder app,
IHostingEnvironment env)
{
if (env.IsDevelopment())
{
app.UseDeveloperExceptionPage();
}
app.UseSwagger();
app.UseSwaggerUI(c =>
{
c.SwaggerEndpoint("/swagger/v1/swagger.json", "My API
V1");
});
app.UseMvc();
}
Step 11
Now right click of our project and then go to Properties option >> Debug >>Launch browser and right swagger in text box like below Image.

Step 12
Now, Run the project and wow wonderful UI really great and user friendly and checking purpose also very easy.

Now we can check by functionality.

How to create Angular 7 project in Visual studio code.
Step 13
We have finished API part. Now, we will create Angular part i.e. we will consume API using angular 7 and we will use visual studio code editor. If you don't have Visual studio code in your system then first you have to download and install. For download you go this link.
First we have to make sure our system has installed of angular CLI or not. If don't have installed then first we need to install.
First we have to make sure our system has installed of angular CLI or not. If don't have installed then first we need to install.
Open command prompt and type below code and press enter
npm install -g @angular/cli
Now, open visual studio code and create project name.
Open TERMINAL in visual studio code and type below syntax in command for create a project
ng new CRUDAnugular
After that, hit Enter. it will take a little bit time after that we can see the our project name
Open TERMINAL in visual studio code and type below syntax in command for create a project
ng new CRUDAnugular
After that, hit Enter. it will take a little bit time after that we can see the our project name

After that pres enter

Step 14
Now we will create component or service but before that we will use some bootstrap library for attractive design.So now we will open Get bootstrap site of this link
After open this website, click on Get Started button and click copy option on css section and js section.

And paste on Index.html


Step 15
Now we will add component.
Now , we can create a component any meaning full name and related to our functionality. I will create a component with employee detail name
So, again go to the TERMINAL and go our angular project location using below command
cd projectName
ng g c employee-details --spec=false --s
Note:In upper command, I have given --spec=false and then --s because if we create normally without that command then it creates 4 files but when we don't want to create style and spec file then we can use upper command.
Now press enter

similarly we will create two more component in side the employee details
For Register
ng g c employee-details/employee-register-details --spec=false --s
For Employee list
ng g c employee-details/employee-List-details --spec=false --s

Step 16
Now we will create service
ng g s shared/employee-details --spec=false
Now we will create a model class
ng g cl shared/employee-details --type=model
Now we can see the generated components and service
Step 17
Creation has completed.
Now Open employee-details.model class in shared folder and write properties of model class
export class EmployeeDetails {
EmployeeId:number;
FirstName:string;
LastName:string;
Email:string;
MobileNo:string;
Address:string;
PineCode:string;
}
Step 18
Now we will design our employee reconsideration form and also we will use some icon
for more attractive look.
So First we will go font awesome website for reference of icon link and then click Start Using Free
and then copy of css Url and paste in head tag on Index.html page
<link rel="stylesheet" href="https://use.fontawesome.com/releases/v5.6.3/css/all.css"
integrity="sha384-UHRtZLI+pbxtHCWp1t77Bi1L4ZtiqrqD80Kn4Z8NTSRyMA2Fd33n5dQ8lWUE00s/"
crossorigin="anonymous">
And search icon according to our requirement and click of icon and after that copy icon code
Step 29
Now frist, we will design registration page and check validation.
Open employee-register-details.component.html file and write below code.
<form #form="ngForm" outcomplete="off" (submit)="onSubmit(form)">
<input type="hidden" name="EmployeeId" [value]="service.formData.EmployeeId">
<div class="form-group">
<div class="input-group">
<div class="input-group-prepend">
<div class="input-group-text bg-white">
<i class="fas fa-user-secret" [class.green-icon]="FirstName.valid" [class.red-icon]="FirstName.invalid
&& FirstName.touched"></i>
</div>
</div>
<input class="form-control" name="FirstName" required #FirstName="ngModel" [(ngModel)]="service.formData.FirstName" placeholder="Please enter First Name">
</div>
</div>
<div class="form-group">
<div class="input-group">
<div class="input-group-prepend">
<div class="input-group-text bg-red">
<i class="fas fa-user-secret" [class.green-icon]="LastName.valid" [class.red-icon]="LastName.invalid
&& LastName.touched"></i>
</div>
</div>
<input class="form-control" name="LastName" #LastName="ngModel" required [(ngModel)]="service.formData.LastName" placeholder="Please enter Last Name">
</div>
</div>
<div class="form-group">
<div class="input-group">
<div class="input-group-prepend">
<div class="input-group-text bg-red">
<i class="fas fa-at" [class.green-icon]="Email.valid" [class.red-icon]="Email.invalid
&& Email.touched"></i>
</div>
</div>
<input class="form-control" name="Email" required #Email="ngModel" [(ngModel)]="service.formData.Email" placeholder="Please Enter Email">
</div>
</div>
<div class="form-group">
<div class="input-group">
<div class="input-group-prepend">
<div class="input-group-text bg-red">
<i class="fas fa-phone" [class.green-icon]="MobileNo.valid" [class.red-icon]="MobileNo.invalid
&& MobileNo.touched"></i>
</div>
</div>
<input class="form-control" required name="MobileNo" #MobileNo="ngModel" [(ngModel)]="service.formData.MobileNo" placeholder="Please enter Mobile Number">
</div>
</div>
<div class="form-group">
<div class="input-group">
<div class="input-group-prepend">
<div class="input-group-text bg-red">
<i class="fas fa-address-card" [class.green-icon]="Address.valid" [class.red-icon]="Address.invalid
&& Address.touched"></i>
</div>
</div>
<input class="form-control" required name="Address" #Address="ngModel" [(ngModel)]="service.formData.Address" placeholder="Please enter
Address">
</div>
</div>
<div class="form-group">
<div class="input-group">
<div class="input-group-prepend">
<div class="input-group-text bg-red">
<i class="fas fa-sort-numeric-down" [class.green-icon]="PineCode.valid" [class.red-icon]="PineCode.invalid
&& PineCode.touched"></i>
</div>
</div>
<input class="form-control" required name="PineCode" #PineCode="ngModel" [(ngModel)]="service.formData.PineCode" placeholder="Please enter Pine Code">
</div>
</div>
<div class="form-group">
<button class="btn btn-success
btn-lg btn-block" [disabled]="form.invalid" type="submit"><i class="fas fa-database"></i> Save in Database</button>
</div>
</form>
input.ng-touched.ng-invalid{
border-color:#dc3545;
}
input.ng-valid{
border-color:#28a745;
}
.red-icon{
color:#dc3545;
}
.green-icon{
color:#28a745;
}
#toast-container > div{
opacity:1;
}
And also added toast-container for toast notification.Okay Now check once our
design coming properly or not and also check validation.So let us run.

See output

Step 20
Now Let us complete all functility then we will check finally
Now open app.module.ts class and write below code or replace with highlighted code.
import { BrowserModule } from '@angular/platform-browser';
import { NgModule } from '@angular/core';
import{ FormsModule} from '@angular/forms';
import { BrowserAnimationsModule } from '@angular/platform-browser/animations';
import { ToastrModule } from 'ngx-toastr';
import { AppRoutingModule } from './app-routing.module';
import { AppComponent } from './app.component';
import { EmployeeDetailsComponent } from './employee-details/employee-details.component';
import { EmployeeRegisterDetailsComponent } from './employee-details/employee-register-details/employee-register-details.component';
import { EmployeeListDetailsComponent } from './employee-details/employee-list-details/employee-list-details.component';
import { EmployeeDetailsService } from './shared/employee-details.service';
import { HttpClientModule } from '@angular/common/http';
@NgModule({
declarations: [
AppComponent,
EmployeeDetailsComponent,
EmployeeRegisterDetailsComponent,
EmployeeListDetailsComponent
],
imports: [
BrowserModule,
AppRoutingModule,
FormsModule,
HttpClientModule,
BrowserAnimationsModule,
ToastrModule.forRoot()
],
providers: [EmployeeDetailsService],
bootstrap: [AppComponent]
})
export class AppModule { }
Now open app.component.html remove default html code and write below code
<div class="container">
<app-employee-register-details></app-employee-register-details>
</div>
Step 21
import { Injectable } from '@angular/core';
import { EmployeeDetails } from './employee-details.model';
import { HttpClient } from "@angular/common/http";
@Injectable({
providedIn: 'root'
})
export class EmployeeDetailsService {
formData:EmployeeDetails;
readonly rootURL = 'http://localhost:60249/api';
list : EmployeeDetails[];
constructor(private http: HttpClient) { }
postEmployeeDetail() {
return this.http.post(this.rootURL + '/EmployeeAPI/InsertEmpDetails', this.formData);
}
putEmployeeDetail() {
return this.http.put(this.rootURL + '/EmployeeAPI/UpdateEmpDetails/'+ this.formData.EmployeeId, this.formData);
}
deleteEmployeeDetail(id) {
return this.http.delete(this.rootURL + '/EmployeeAPI/DeleteEmp/'+ id);
}
EmployeeList(){
this.http.get(this.rootURL + '/EmployeeAPI/AllEmployeeDetails')
.toPromise()
.then(res => this.list = res as EmployeeDetails[]);
}
}
Step 22
Now we will perform register operation and we have already design for register page.
Open employee-register-details.component.ts class and write.
import { Component, OnInit } from '@angular/core';
import { EmployeeDetailsService } from 'src/app/shared/employee-details.service';
import { NgForm } from '@angular/forms';
import { ToastrService } from 'ngx-toastr';
@Component({
selector: 'app-employee-register-details',
templateUrl: './employee-register-details.component.html',
styles: []
})
export class EmployeeRegisterDetailsComponent implements OnInit {
constructor(private service:EmployeeDetailsService,private toastr: ToastrService) { }
ngOnInit() {
this.resetForm();
}
resetForm(form?: NgForm) {
if (form != null)
form.form.reset();
this.service.formData = {
EmployeeId:0,
FirstName:'',
LastName:'',
Email:'',
MobileNo:'',
Address:'',
PineCode:''
}
}
onSubmit(form: NgForm) {
if (this.service.formData.EmployeeId == 0)
this.insertRecord(form);
else
this.updateRecord(form);
}
insertRecord(form: NgForm) {
this.service.postEmployeeDetail().subscribe(
res => {
debugger;
this.resetForm(form);
this.toastr.success('Submitted
successfully', 'Employee Detail Register');
this.service.EmployeeList();
},
err => {
debugger;
console.log(err);
}
)
}
updateRecord(form: NgForm) {
this.service.putEmployeeDetail().subscribe(
res => {
this.resetForm(form);
this.toastr.info('Updated successfully', 'Employee Detail
Register');
this.service.EmployeeList();
},
err => {
console.log(err);
}
)
}
Step 23
we have completed for registration.
Now, we will do for Employee details ,update and delete operation.
Open employee-list-details.component.html in side employee-list-details
and write below code
<table class="table
table-hover">
<tr class="btn-info">
<th>FirstName</th>
<th>LastName</th>
<th>Email</th>
<th>MobileNo</th>
<th>Address</th>
<th>PineCode</th>
<th>Action</th>
</tr>
<tr *ngFor="let data of service.list">
<td (click)="editForm(data)">{{data.FirstName}}</td>
<td (click)="editForm(data)">{{data.LastName}}</td>
<td (click)="editForm(data)">{{data.Email}}</td>
<td (click)="editForm(data)">{{data.MobileNo}}</td>
<td (click)="editForm(data)">{{data.Address}}</td>
<td (click)="editForm(data)">{{data.PineCode}}</td>
<td>
<i class="far fa-trash-alt fa-lg text-danger" (click)="empDelete(data.EmployeeId)"></i>
</td>
</tr>
</table>
Open employee-list-details.component.ts in side employee-list-details
and write below code.
import { Component, OnInit } from '@angular/core';
import { ToastrService } from 'ngx-toastr';
import { EmployeeDetailsService } from 'src/app/shared/employee-details.service';
import { EmployeeDetails } from 'src/app/shared/employee-details.model';
@Component({
selector: 'app-employee-list-details',
templateUrl: './employee-list-details.component.html',
styles: []
})
export class EmployeeListDetailsComponent implements OnInit {
constructor(private service: EmployeeDetailsService,
private toastr: ToastrService) { }
ngOnInit() {
this.service.EmployeeList();
}
editForm(a: EmployeeDetails) {
this.service.formData = Object.assign({}, a);
}
empDelete(EmpId) {
if (confirm('Are you sure to
delete this record ?')) {
this.service.deleteEmployeeDetail(EmpId)
.subscribe(res => {
debugger;
this.service.EmployeeList();
this.toastr.warning('Employee details
Deleted successfully', 'Employee Detail Register');
},
err => {
debugger;
console.log(err);
})
}
}
}
Step 24
Now open employee-details.component.html and write below code
<div class="jumbtron">
<h1 class="display-4
text-center">Employee Register</h1>
<hr>
<div class="row text-center" >
<div class="col-md-2"></div>
<div align="center" class="col-md-8">
<app-employee-register-details>
</app-employee-register-details>
</div>
</div>
<div class="row
text-center" >
<div class="col-md-2"></div>
<div align="center" class="col-md-8">
<h3>Employee Details</h3>
<app-employee-list-details>
</app-employee-list-details>
</div>
</div>
</div>
Step 25
We have completed CRUD operation coding.
Now we will use one more thing.Here we will use toastr notification for operation message
Now let us install ngx-toastr
npm install ngx-toastr --save
Now again, add below code in app.module.ts
import { BrowserAnimationsModule } from '@angular/platform-browser/animations';
First, Let us see how to resolve this problem?
Now, we will go in to our web API project.
For that, we have to download "CORS" in Web API project. Go to NuGet Package Manager and download the following file.

and also add below namespace in startup class
using Microsoft.EntityFrameworkCore;
Step 27
Finally, we have done coding part in Angular side and as well as server side i.e MVC
Now, We will check functionality
 See all output
 Finally, We have done every functionality If you want to download project then You can download the project from github
Now again, add below code in app.module.ts
import { BrowserAnimationsModule } from '@angular/platform-browser/animations';
import { ToastrModule } from 'ngx-toastr';
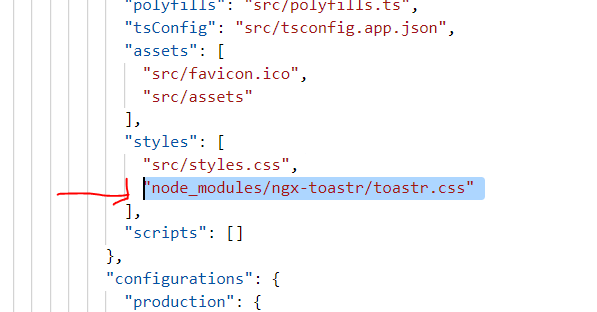
Now, add below css class in angular.json in sidethe Styles
"node_modules/ngx-toastr/toastr.css"
Step 26
We will consume api from other port or domain. So, angular will block the URL and also we call this issue is CORS(Cross Origin Resource Sharing).
First, Let us see how to resolve this problem?
Now, we will go in to our web API project.
For that, we have to download "CORS" in Web API project. Go to NuGet Package Manager and download the following file.
Now open Startup class and go in side Configure method and add highlighted code.
public void
Configure(IApplicationBuilder app, IHostingEnvironment env)
{
if (env.IsDevelopment())
{
app.UseDeveloperExceptionPage();
}
app.UseCors(options =>
options.WithOrigins("http://localhost:4200")
.AllowAnyMethod()
.AllowAnyHeader());
app.UseSwagger();
app.UseSwaggerUI(c =>
{
c.SwaggerEndpoint("/swagger/v1/swagger.json", "My API
V1");
});
app.UseMvc();
}
and also add below namespace in startup class
using Microsoft.EntityFrameworkCore;
Step 27
Finally, we have done coding part in Angular side and as well as server side i.e MVC
Now, We will check functionality

1 comment:
Good Post. I like your blog. Thanks for Sharing information.
.Net training in Delhi
Post a Comment